Saltar al contenido
MisLibrosTexto
Ad

Building a Positive Image: Portraiture Project and Timetable

📄 ejercicios ingles 🎓 otro · 2° TELESECUNDARIA México 🇲🇽 MX 🗣 Español
Página 28
28 de 171
Página 28 de Uérakua anapu uantakua. Projects and Readings.  Libro de Educación Telesecundaria Grado 2°  Ciclo Escolar 2025 - 2026
Anterior Página 28 / 171 Siguiente

Respuesta rápida

El proyecto busca retratar a la comunidad sin estereotipos, reconociendo su diversidad y usando técnicas artesanales locales. Se organiza en 4 semanas: planear, producir, montar y exponer, evaluar y cerrar.

📚 exercise ingles ⭐⭐ Dificultad 2/5 ⏱ 8 min lectura

Solución — Página 28

Uérakua anapu uantakua. Projects and Readings. Libro de Educación Telesecundaria Grado 2° Ciclo Escolar 2025 - 2026

1
Ejercicio 1

Enunciado: Building a positive image of the people that make up the community and not using portraits to exhibit stereotypes or prejudice is very important. On the contrary, you should try to eliminate them and be more respectful about the differences resulting from reflection and artistic creation. This is why dialogue and cooperation in creating the portraits include the community in the process so that people have an active role in building their image.

  1. Identifico la idea principal: construir una imagen positiva de las personas de la comunidad mediante retratos.
  2. Reconozco la intención: evitar estereotipos y prejuicios, y respetar las diferencias.
  3. Explico el medio: el diálogo y la cooperación incluyen a la comunidad en el proceso para que las personas tengan un papel activo en la construcción de su imagen.
Respuesta

El texto sostiene que los retratos deben mostrar a las personas reales de la comunidad, sin estereotipos ni prejuicios, y que la comunidad debe participar activamente en la creación de su propia imagen.

2
Ejercicio 2

Enunciado: These are the most relevant aspects of the project: a) Acknowledge the diversity of cultures, ethnic groups, genders, ages, bodies, faces, and lifestyles present in your community to contribute to the elimination of violence and discrimination against these groups. b) Use portraiture to analyze different techniques and to illustrate these differences. c) Create portraits of people and build a dialogue with them about the creation of their portrait so they participate in it; that is, to share stories and consider significant elements they want to include in their portrait.

a
Parte 2.a
  1. Identifico la acción clave: reconocer la diversidad.
  2. Enumero los tipos de diversidad: culturas, grupos étnicos, géneros, edades, cuerpos, rostros y estilos de vida.
  3. Relaciono el reconocimiento con la finalidad: contribuir a eliminar la violencia y la discriminación.
Respuesta

Reconocer la diversidad de culturas, etnias, géneros, edades, cuerpos, rostros y estilos de vida de la comunidad para contribuir a eliminar la violencia y la discriminación contra esos grupos.

b
Parte 2.b
  1. Identifico la técnica: el retrato (portraiture).
  2. Distingo dos usos: analizar diferentes técnicas y mostrar las diferencias.
Respuesta

Usar el retrato para analizar distintas técnicas artísticas y para representar las diferencias de la comunidad.

c
Parte 2.c
  1. Identifico la acción: crear retratos de personas.
  2. Establezco el diálogo con la persona retratada.
  3. Incluyo sus historias y los elementos que quiere que aparezcan.
Respuesta

Crear retratos dialogando con las personas retratadas, compartiendo sus historias e incluyendo los elementos significativos que ellas quieran incorporar.

3
Ejercicio 3

Enunciado: Comprehension and Production. Gathered in communities, do the following activities to exhibit the portraits: a) Set up an art gallery in a public space. You may use the walls of your school, the town's park, or others. Use local handicraft materials and techniques. b) Make your portraits using the community's handicraft techniques, such as embroidery, pottery, wood, or stone carving, among others, to give life to your portraits. You can make 3D portraits connecting cultures and origins with local materials.

a
Parte 3.a
  1. Elijo un espacio público: muros de la escuela, parque del pueblo u otro.
  2. Uso materiales y técnicas artesanales locales.
  3. Organizo una galería de arte con los retratos.
Respuesta

Montar una galería de arte en un espacio público, usando muros escolares, el parque u otros lugares, con materiales y técnicas artesanales locales.

b
Parte 3.b
  1. Selecciono técnicas artesanales de la comunidad: bordado, alfarería, madera o tallado en piedra.
  2. Aplico esas técnicas para dar vida a los retratos.
  3. Puedo elaborar retratos en 3D que conecten culturas y orígenes con materiales locales.
Respuesta

Elaborar los retratos con técnicas artesanales de la comunidad (bordado, alfarería, madera, tallado en piedra, entre otras) y, si se desea, hacer retratos en 3D que conecten culturas y orígenes con materiales locales.

Ad
4
Ejercicio 4

Enunciado: These are only suggestions. You may include additional objectives or change them according to the classroom community's needs or experiences. To complete the activities, you will use the following timetable: Week 1, 2, 3, 4.

  1. Semana 1: Día 1, presentar el proyecto y sus objetivos; Día 2, formar grupos y asignar tareas; Días 3 y 4, planear y organizar el proyecto (temas, técnicas, recursos, presupuesto).
  2. Semana 2: Días 5 a 9, producir las obras (retratos, exposición, performance); Día 10, ensayo general y cambios finales.
  3. Semana 3: Días 11 a 13, planear y organizar la exposición (lugar, hora y promoción); Días 14 y 15, montar la exposición y preparar los materiales.
  4. Semana 4: Día 16, inaugurar la exposición y presentar el proyecto al público; Días 17 y 18, exposición abierta al público; Días 19 y 20, revisar resultados y evaluar el proyecto (logros y retos); Día 21, cerrar la exposición y reconocer al equipo y a los colaboradores.
Respuesta

El cronograma se organiza en 4 semanas y 21 días: planificación (días 1-4), producción (días 5-10), organización y montaje de la exposición (días 11-15) y apertura, evaluación y cierre (días 16-21).

Contenido de la página

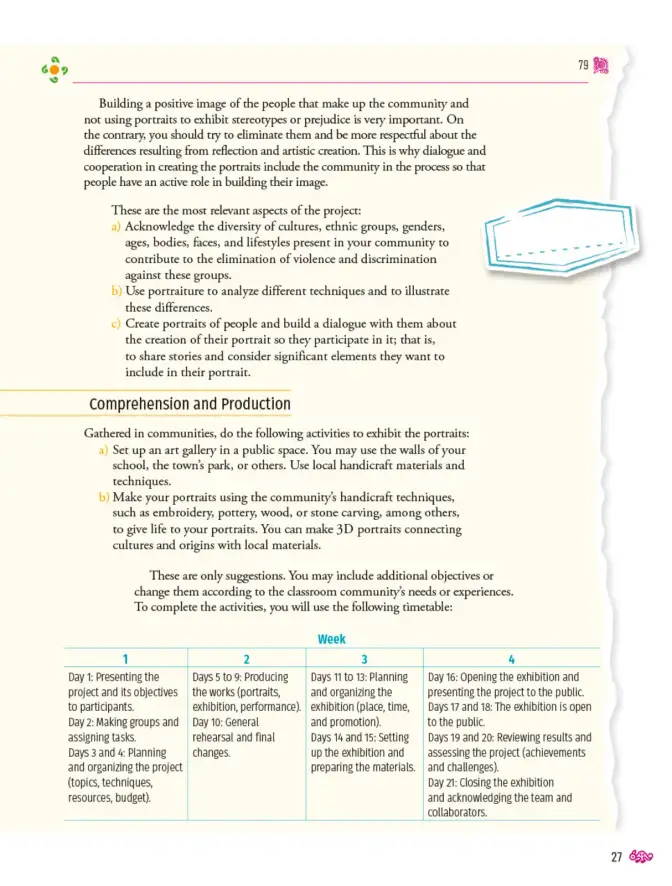
Building a positive image of the people that make up the community and not using portraits to exhibit stereotypes or prejudice is very important. On the contrary, you should try to eliminate them and be more respectful about the differences resulting from reflection and artistic creation. This is why dialogue and cooperation in creating the portraits include the community in the process so that people have an active role in building their image.

These are the most relevant aspects of the project:

a) Acknowledge the diversity of cultures, ethnic groups, genders, ages, bodies, faces, and lifestyles present in your community to contribute to the elimination of violence and discrimination against these groups.

b) Use portraiture to analyze different techniques and to illustrate these differences.

c) Create portraits of people and build a dialogue with them about the creation of their portrait so they participate in it; that is, to share stories and consider significant elements they want to include in their portrait.

Comprehension and Production

Gathered in communities, do the following activities to exhibit the portraits:

a) Set up an art gallery in a public space. You may use the walls of your school, the town's park, or others. Use local handicraft materials and techniques.

b) Make your portraits using the community's handicraft techniques, such as embroidery, pottery, wood, or stone carving, among others, to give life to your portraits. You can make 3D portraits connecting cultures and origins with local materials.

These are only suggestions. You may include additional objectives or change them according to the classroom community's needs or experiences. To complete the activities, you will use the following timetable:

Week

1 2 3 4
Day 1: Presenting the project and its objectives to participants. Day 2: Making groups and assigning tasks. Days 3 and 4: Planning and organizing the project (topics, techniques, resources, budget). Days 5 to 9: Producing the works (portraits, exhibition, performance). Day 10: General rehearsal and final changes. Days 11 to 13: Planning and organizing the exhibition (place, time, and promotion). Days 14 and 15: Setting up the exhibition and preparing the materials. Day 16: Opening the exhibition and presenting the project to the public. Days 17 and 18: The exhibition is open to the public. Days 19 and 20: Reviewing results and assessing the project (achievements and challenges). Day 21: Closing the exhibition and acknowledging the team and collaborators.

Tabla

Semana Actividades
1 Día 1: presentar el proyecto y sus objetivos. Día 2: formar grupos y asignar tareas. Días 3 y 4: planear y organizar el proyecto (temas, técnicas, recursos, presupuesto).
2 Días 5 a 9: producir las obras (retratos, exposición, performance). Día 10: ensayo general y cambios finales.
3 Días 11 a 13: planear y organizar la exposición (lugar, hora y promoción). Días 14 y 15: montar la exposición y preparar los materiales.
4 Día 16: inaugurar la exposición y presentar el proyecto al público. Días 17 y 18: exposición abierta al público. Días 19 y 20: revisar resultados y evaluar el proyecto (logros y retos). Día 21: cerrar la exposición y reconocer al equipo y a los colaboradores.

Diagrama

timeline
    title Cronograma del proyecto de retratos
    Semana 1 : Día 1 Presentación del proyecto : Día 2 Formación de grupos : Días 3-4 Planificación
    Semana 2 : Días 5-9 Producción de obras : Día 10 Ensayo general
    Semana 3 : Días 11-13 Organización de la exposición : Días 14-15 Montaje
    Semana 4 : Día 16 Inauguración : Días 17-18 Exposición abierta : Días 19-20 Evaluación : Día 21 Cierre

Glosario (8)

portrait
retrato; representación artística de una persona
stereotype
estereotipo; idea generalizada y simplificada sobre un grupo
prejudice
prejuicio; opinión preconcebida sin fundamento
diversity
diversidad; variedad de culturas, etnias, géneros, edades, etc.
handicraft
artesanía; trabajo manual con materiales locales
embroidery
bordado; técnica decorativa con hilo y aguja
pottery
alfarería; elaboración de objetos de barro
exhibition
exposición; muestra pública de obras

Preguntas para practicar

Why is it important to build a positive image of the community?

Porque permite valorar la diversidad y evita que los retratos reproduzcan estereotipos o prejuicios, fomentando el respeto y la participación activa de las personas en su propia representación.

How can local handicraft techniques help in making portraits?

Las técnicas artesanales locales aportan identidad cultural y conectan los retratos con el origen de la comunidad; además, permiten experimentar con bordado, alfarería, madera o piedra y crear obras en 3D.

Temas y conceptos clave

Imagen positiva de la comunidadRetrato y diversidadEliminación de estereotipos y prejuiciosGalería de arte comunitarioCronograma de proyectoretratodiversidadestereotipoprejuiciodiálogocooperaciónartesanía localexposición
¿Te fue útil esta página?

Figuras de la página (1)

Recuadro decorativo con líneas punteadas, similar a una etiqueta o marco vacío.
Figura 1 image

Preguntas que la gente también hace

¿Cómo hacer un retrato sin estereotipos?
Consulta la solución completa arriba o explora el libro entero para temas relacionados.
¿Qué técnicas artesanales puedo usar para un retrato?
Consulta la solución completa arriba o explora el libro entero para temas relacionados.
¿Cómo organizar una exposición escolar en 4 semanas?
Consulta la solución completa arriba o explora el libro entero para temas relacionados.
📌 Antes de leer esto
  • • Vocabulario básico en inglés sobre arte y comunidad
  • • Identificación de ideas principales en un texto
  • • Nociones de trabajo colaborativo
Siguiente tema sugerido
Presentación oral del proyecto y evaluación de la exposición
📝 Transcripción de la página (texto seleccionable) 2708 caracteres

Building a positive image of the people that make up the community and not using portraits to exhibit stereotypes or prejudice is very important. On the contrary, you should try to eliminate them and be more respectful about the differences resulting from reflection and artistic creation. This is why dialogue and cooperation in creating the portraits include the community in the process so that people have an active role in building their image.

These are the most relevant aspects of the project:

a) Acknowledge the diversity of cultures, ethnic groups, genders,ages, bodies, faces, and lifestyles present in your community to contribute to the elimination of violence and discrimination against these groups.

b) Use portraiture to analyze different techniques and to illustrate these differences.

Create portraits of people and build a dialogue with them about the creation of their portrait so they participate in it; that is,to share stories and consider significant elements they want to include in their portrait.

Comprehension and Production

Gathered in communities, do the following activities to exhibit the portraits:a) Set up an art gallery in a public space. You may use the walls of your school, the town's park, or others. Use local handicraft materials and techniques.

b) Make your portraits using the community's handicraft techniques,such as embroidery, pottery, wood, or stone carving, among others,to give life to your portraits. You can make 3D portraits connecting cultures and origins with local materials.

These are only suggestions. You may include additional objectives or change them according to the classroom community's needs or experiences.To complete the activities, you will use the following timetable:

,

79

![](page=0,bbox=[870, 354, 1160, 504])

Week

1234
Day 1: Presenting the project and its objectives to participants. Day 2: Making groups and assigning tasks. Days 3 and 4: Planning and organizing the project (topics, techniques, resources, budget).Days 5 to 9: Producing the works (portraits, exhibition, performance). Day 10: General rehearsal and final changes.Days 11 to 13: Planning and organizing the exhibition (place, time, and promotion). Days 14 and 15: Setting up the exhibition and preparing the materials.Day 16: Opening the exhibition and presenting the project to the public. Days 17 and 18: The exhibition is open to the public. Days 19 and 20: Reviewing results and assessing the project (achievements and challenges). Day 21: Closing the exhibition and acknowledging the team and collaborators.

27

8
Ad

Otros libros recomendados

Ver todos →
Ad

Usamos cookies propias y de terceros para personalizar contenido, mostrar publicidad y analizar el tráfico. Las cookies necesarias siempre están activas.